Wednesday, August 12, 2020

Assorted Bee Books

It took a while but I'm back from crochet land... lol. I've made a bunch of birds and crocheted a bunch of trims, took some time off and now I'm ready to do something else for a while. I have an assortment of Bee themed journals done. Here they are:


The outsides are a little different but the insides carry the theme through out. The pages are a little different but similar using the same graphics and keeping with the theme. They are hardback journals with a fabric wrap and handmade beads and ribbon tassels. 


Plenty of room to journal. Lots of pockets, cards, flowers and bee imagery. Each book has a yellow, pink or purple pop-up flower. And the pages have a mix of fabric swatches sewn in. 


I used up a lot of supplies on these and I just love the way they all turned out. I think my next set will be birds... or maybe fashion. It's hard to decide. They will have more crocheted accents than usual. I love to combine my different hobbies together to make these books unique and pretty.


Thursday, April 30, 2020

More Lacy Trims

Still making trims with a floral theme but ran across a couple of lace patterns. This little pattern was so demure with little hearts encircled into a lacey edge, they almost look like flowers in a basket. Cute, cute, cute.


And this one caught my eye because of the feminine lacey look. It's little fans!


My favorites are the plain trims and the florals but I also like the motifs. I guess they're all my favorites. All of them can be made into string crochet or you can use a larger hook and heavier yarn for bigger projects. Use them any way you can think of. That's the beauty of crochet, it is so adaptable and versatile for any project you can imagine.

Saturday, April 25, 2020

Teddy Bears on Swings

I've been wanting to make these for a while but didn't have the right colors of string to make them the way I wanted to. So I made the first ones tan and pink instead of brown and red. I had so much trouble finding red crochet cotton #10 around here and they were all out online too. What's up with that? Does everyone sit at home and crochet red things all at the same time??? So I made the first set with the colors I had.


I eventually did find a darker red at Walmart so I just got that but I wanted a lighter, brighter red so I got some embroidery thread to use for the swings. The good thing about using embroidery thread is that you can take off one or two ply of it to make it the thickness you need to match the crochet cotton. I've got to have the right shade when I want to make something. That explains the zillion balls of thread I've collected. LOL

So the first thing you do with this pattern is make the bears. It's about one bear for every inch and a half that you want to make of trim. Then you just crochet the swings around them and add the seats to finish them off.

I love these little guys! You really need to stiffen them with stiffener or white glue to make them lay flat and you can slide them around a little on the swings to position them better than I did. They look great anchored to a baby blanket instead of dangling where they would get all twisted up though. You could use a strip of them close to the edge of a towel just for baby and they would be adorable.

Friday, April 17, 2020

Dreaming of Summer

I've done skipped right over Spring! I ran into a few YouTube videos of string crochet. I discovered that I absolutely love this work, but I prefer diagrams or written instructions over videos. Everybody is a YouTube star these days so.... anyway - I had to make this little mermaid! She's pretty big. Too big for a border on the stuff I work on but she does fill a page. Just one finished mermaid done in number 10 cotton string is 5" by 7" so she will fit into my books. She's a beautiful decoration!


Actually, if you are an advanced crocheter, you don't really have to anchor her at all. You can modify the pattern to leave off the rock and the base and just make her free standing so you can position her vertically for the front of a book. Hmmm.... that's an idea. How would you love to open up a handmade book with crochet trimmed pages and find her in it? I can think of a few different ways to use her besides trim work, can't you?

I really like the motifs you can make with string. They are a little too big for a border I think but they are so cute I can't resist making a few. I crocheted the blue base onto a chain made into card stock so I can remove it from the paper if I want to attach it to fabric later.

I love the work that goes on with the YouTube channel by "lace star" named Puntillas Estrella". So go look for her channel. Even if you don't speak Spanish you can follow along. She does a lot of colorful and exciting shapes into her border work and you can follow along by starting and stopping the video as needed.

I'm also still using patterns from books and I've discovered more trims and border patterns from out of print Japanese books (from 2003) whose last printing was in Chinese. It really doesn't matter what language they are written in as long as they have diagrams you can read. Crochet is pretty universal like that.

The main difference in crochet is between the instructions printed in the US and the ones printed in the UK. The UK uses different terminology for the same stitches.


Tuesday, April 7, 2020

Beautiful Trims for Pages

So this is what I've been working on. I got hooked (no pun intended) on crocheting these string trims while I was working on my books. I thought I would decorate the fronts and maybe down some pages with these trims made of string. I really like the way they look. I crochet them on paper or card stock, block them for stiffness to give them body and then attach the trim to card with washi tape to keep them nice and flat until I'm ready to use them.


I love to crochet so it was an easy jump for me to go smaller with string instead of yarn. I don't think I have the patience to sit and do a bunch of doilies, but I love working these edges in small sections. I can get one or two done in a day if I'm not too busy with other things. It's instant gratification where crochet is concerned.

I started to work out a few patterns and I haven't crocheted in so long that I did not know they use diagrams now a lot. So I had to learn how to read the diagrams and I like them too because I don't have to mark up my pages while I work, I can just look at the diagram and tell where I'm at.

I'm making some little 7 inch sample runs of these patterns. I got these patterns out of a book by Caitlin Sainio called "75 Exquisite Trims in Thread Crochet".


Some of the patterns are absolutely adorable like the dolphins jumping in waves and the teddy bears on swings. I'll get around to a lot of them before I'm done. This is how my projects get sidetracked. Can't say when I'll get back to my handmade journals now but these trims are perfect for sewing down the edge of a few pages in them for a wow factor.

Five by seven inches is the standard book page size for most of the books I make. I know some people decorate pillow cases with these edgings but I get to use all my stuff in my handmade books and if you just want to do a smaller project like a page edge, it's perfect beginner stuff to practice. T

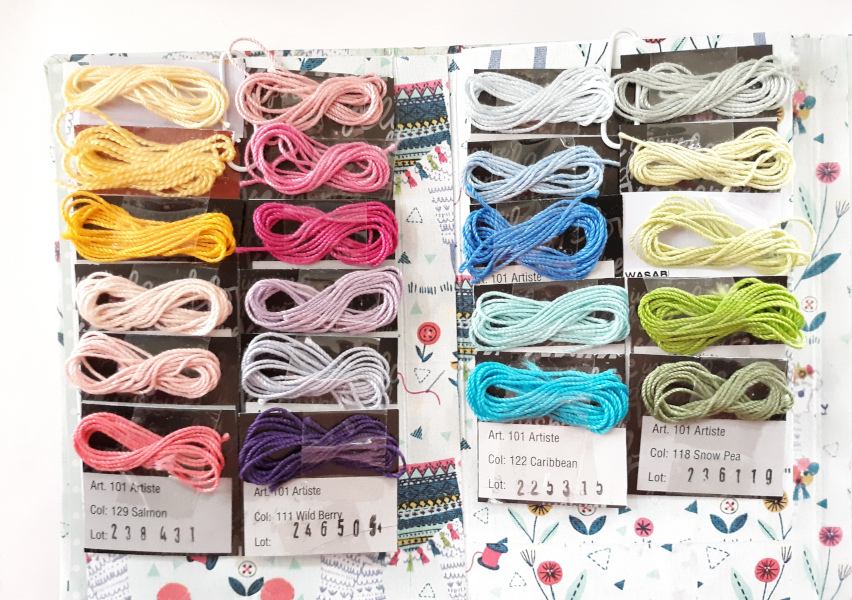
The cotton string comes in a wide variety of colors. I use Artiste from Hobby Lobby. They have so many colors to choose from, probably around 50 or more. I wish I had gotten red and a few browns but it will have to wait until next trip because I'm wanting to make some teddy bears on swings so bad. I guess there's nothing keeping me from making them bigger out of yarn for practice... hmmm.


Some of the patterns are complicated so you really have to watch the instructions close to get them right. But once you make a trim, you got it. It's much easier to make these on a stiff edge like a piece of card and then tear them off the paper to sew them in place. Or if you want you can just glue the paper to the edge of your page.


I've figured out a way to chain through a line of holes in card and then crochet on that, so when I remove the paper, my edge will hold its shape. It's hard to crochet in an ungrounded string chain that twists and turns every which way. But you can crochet an edge on anything you can poke a hole into.

I'm in love with those little elephants. I want to make some pink ones!


Monday, March 30, 2020

All The Pretty Birds

This has absolutely nothing to do with journal making but once I got sidetracked off to crochet, I had to do a few patterns and other little things. I love these birds so much I bought a pattern for them but then I didn't like the pattern so much so I completely rewrote it to work with #10 crochet thread after I made 2 or 3 of them. I could not find the suggested size yarn in the instructions.


And I have to tell you, they look like real birds from a distance just for the shape and colors of them. The original pattern was used for the green bird on the right and then I started nitpicking it to pieces into something I liked much better. My pattern is the blue one on the left. Similar but very different to crochet. I like my wings much better and they take a lot less time to make. I trimmed down the bird and made him longer because I thought it was a little too plump and I made other changes too.


I also changed the size of the thread and needle to give me a smaller bird. I found some very colorful egyptian cotton crochet thread to work with - that I absolutely love at Hobby Lobby. It's their brand called Artiste 100% egyptian cotton size #10 and they have a wider color selection than any other brand I've found. It was on sale for 30% off making it 2 bucks a ball of 400 yds.

I'm working on sculpting a nose and beak out of polymer clay that can be attached with just two knots. I used to raise parakeets aka budgies. I love them so much but I can't have any birds because I have cats. These are about the same size as the real ones.


I changed the feet, the wings, the body, the tail. OK, so I completely rewrote my own pattern. The almost all white ones with light shading on the wings are called lacewings. I've still got some sewing to do on this one to blend the light green into white with crewel embroidery thread.


It's starting to look like a bird factory around here! There are so many different color combinations of yellow, green and blue you can make. I've made about ten of them and I haven't made two birds exactly alike yet. These last ones are waiting for me to get the nose piece sculpted and molded. I have all the feet done. Pretty soon I'm going to have to go outside and cut me a branch for them to perch on.

I can work the pattern and make a complete crocheted bird in under three hours but it takes a little longer to embellish it. Those wire feet have to be wrapped with thread. I used to sculpt dolls with a needle and thread and you really want to know how to hide the knots when you decorate these with thread. The eyes are glass beads. I don't know how many more of them I will make but I do enjoy seeing them come to life!


Why does it feel like somebody is staring at me...


Wednesday, March 18, 2020

Crocheted Enhancements

You might have noticed a little crochet in the edges of the rooftops of my current journals I'm working on. Well that got me off into crochet land for a while and I've been making all kinds of stuff out of string.


I ran across the cutest little edgings that I can use for my pages but the instructions were not written well and I had to try to follow along from a video. There are several of these videos out there and these little elephants are all done a little different, depending on how you interpret the instructions. But even those are translated really, really bad - I couldn't make heads or tails out of them. Doesn't anyone know how to read and write clear and concise crochet language any more?

I love to crochet little edgings onto paper pages and I can think of a few different ways to put these into a journal, can't you? I crocheted these on the edge of a printed bag but you could also use cards or fabric. I punched my holes about a quarter of an inch apart with a small hole punch. You can also just poke holes for the foundation stitches. Wouldn't a picot stitch be cute on the edge of a page? I can use all my skills and supplies on journal making.

The best I could figure them out and adjust the pattern to my own liking is how I do them. Since people don't want to write out tutorials any more (everybody wants to be a YouTube star), I finally figured them out and took the time to write out a pattern for my version in case anyone else wants to make them and can't quite figure them out.

I'm pretty certain a person new to crochet or even if you're not new you probably want a good readable pattern. So I made a few elephants a couple of different ways and wrote down the one I liked the best. I have to turn everything into a graphic to upload it here. A .pdf is just a graphic too. This one is a .jpg and blogger compresses it but you can still read it. Just click to enlarge it first, right click and save it then print it off. Here it is. Enjoy!


BIRDS IN THE FUTURE

I've also been crocheting little parakeets out of the same string. Ok so I'm on the internet a lot looking for ideas I can use in my projects and when I run across something I really, really like, I want to make it.

The parakeet pattern I got was less than what I really wanted so I wrote my own. I didn't like the feet, so I made my own. I didn't like the wings, so I made my own pattern. I didn't like the shape of the body so I wrote my own version. I'm still working on making a polymer beak and nose but I have to make some molds when I get them shaped just right. Until then I will be sewing them on.

I will show them soon. They are adorable! I'm trying to figure out how to incorporate them into my books. I love the little birds too.


Thursday, March 5, 2020

How to Make Beaded Pins

First I had to go get some pins and beads. Yes, I already had a few 2" pins but I needed more. And I already had some pretty beads but... I needed to look at some new pretty beads.


What I found was pins with no coil on the bend so I got some of those. And I wanted some gold pins but all I could find was black and silver. There's always alcohol inks. I also found some all wire decorative pins but I figured out a better way to get pins on those by bending wire and making your own if you are good at that.


Found the prettiest beads at Walmart and they were reasonably priced too. So I got a lot of them. Some are for the dangle on the book spine and some for pins.


There are two ways to get beads on the back side of regular pins with a coil. One way is to take a pair of pliers and straighten out the pin, add beads and then try to bend it all back the way it was so it will close right. That's the hard way.

The easiest way is to pull of the crimped head with pliers, straighten out the wire and put beads on it. Then bend the end a little and put the closure back on with a dab of super glue. Crimp the inside of the curve with pliers to hold it snug and you're done. That's the easy way to do it.

You can also buy no coil pins, straighten them out, add beads and just bend them back into shape very easily but they don't look as mystifying as beads with a coil end for some reason.

Another way is to get some heavy gauge wire and bend your own all wire pin into shape, adding the beads onto the back as you go but that takes a little skill to make it look right.

So - pick a way that's easy for you and make a bunch of beaded pins for your journals and other projects. Don't be afraid to experiment with fabric pieces, dangles and charms on them too. You can make some pretty stuff yourself.


Saturday, February 29, 2020

House Journal #1 Cover Done

It always takes a while to get the first one done. I decided to put some beaded pins on them so I had to stop, go get some pins and get some beads and get busy. I do have the inside pages of this journal put together but not semi-decorated yet.


What I mean by semi-decorated or semi-finished is when pockets and tags and other embellishments are added to the pages. Not all the pages get this treatment because whoever gets the book will want to personalize it with their own pictures and stuff too. So I always try to leave plenty of room for that.


I did add some pins and crochet border along the roof lines on both books I'm working on. I also softened the green leaf trim with a whitewash. It was just too dark.


Still working on the cover for this one. To add the pins on both, I glued a piece of fabric scrap to the front and made sure it had plenty of room in the center that was unglued for the pin to fasten on.

Next I'll tell you how I did those pins. Lots of people can't figure them out. It's a little tricky to get those beads on the back side of the pin so you can use the front to stick the pin to something, but it's not hard to do.


Saturday, February 22, 2020

House Shaped Journals

The start of a new journal has begun. I had to drag out my charms to embellish the tassel of this one. I have the cover done and the signatures sewn in so far.


I dyed the "eggs" on the front with a sharpie marker. They are half round pearl finished beads. The finish was so slick that I had time to disperse the marks before they dried. I have fancy alcohol inks I could have used but my markers were handy and they are alcohol based too.


It's hard to see but the little hummingbird was glued on at the very last minute. I hadn't planned it but it needed something. I did most of the sewing on the front piece before gluing it to the cover.


The most time consuming is always making and sewing the signatures in. Once that's done the rest is pretty much fun. I do like sewing pretty fabrics along the edge of the pages even though it takes me a few hours to get them done.


Last but not least is the ribbon tie. I like silk ribbon the best but I've used seam binding and this twill binding tape too. I haven't made one with torn fabric yet. I tea dyed this one before attaching it.

Looking forward to decorating the pages up but I'm already on to the next. It's another house shaped journal much like this one... but a little different. I like to make at least two of everything because I'm going to keep one of them.


Tuesday, February 18, 2020

Second Bee Book

I made another bee book. The first one is always the prototype where I make all my decisions and work out the details. This cover is yellow with a gold lame ribbon.


I can pretty much identify all of them by the covers and inside first page. No two are exactly alike. The pages have been stained with coffee and sprayed with ink. I've also stenciled honeycombs in gold on the backgrounds and used splashes of ink throughout the book. A few of the pages are digital from Nik the booksmith at The Booksmith Shop, some are music sheets, some coloring book pages, some from a garden book and some plain and fancy scrapbooking papers too. Some other ephemera is from the public domain and The Graphics Fairy.


This book has a big purple flower. The beautiful roses throughout the book just give the bees a place to land. You can't have bees without a lot of flowers!